Start Here
How to Install a Power Meter
Fitting pedals takes minutes. The parts that go wrong are the ones nobody talks about: the crank length you forgot to enter, the zero offset you skipped, and the compatibility check you did after ordering instead of before.
Most power meter installs are easy. The reason the question gets asked is that the consequences of getting one small step wrong are invisible — a meter installed at the wrong torque, or with the wrong crank length entered, works perfectly and reports numbers that are quietly wrong for as long as you own it. So this page covers the mechanical procedure, which takes minutes, and then the three setup steps that actually determine whether your data is worth anything.
Before you order: the fitment check
This is the step that saves a return. What you need to confirm depends entirely on the format you are buying, and the difference is stark: pedals need almost nothing checked, crank-based meters need real homework. Power meter pedals vs cranks is the full version of that trade-off.
| Format | What you must check first | How to check it | Risk if wrong |
|---|---|---|---|
| Pedal-based | Crank thickness at the thread (Favero: under 15 mm); no extenders or crank shorteners fitted | Measure the crank at the pedal thread; read the maker's manual | Low — pedal threads are standard on every road crank |
| Bonded crank arm | Exact crankset model and crank length | Read the markings on the back of your existing left crank arm | High — the wrong arm is the wrong part |
| Spindle / crankset | Bottom bracket interface and speed count (e.g. SRAM DUB 12-speed) | Identify your bottom bracket and groupset generation | High |
| Spider | Crankset family and spider pattern (e.g. SRAM AXS) | Identify your crankset model | High |
What to look for in a power meter you intend to fit yourself
A published torque figure. Install torque changes the resting strain inside a strain gauge, which is to say it changes what the meter reads at zero load. A maker that publishes a number has told you how to avoid introducing an error on day one. Garmin and Favero both do.
Tools in the box.A long 8 mm hex key is the specific tool a pedal install wants and the one most home toolkits lack. Favero includes one.
A documented setup procedure. Crank length entry and zero offset are not optional, and a maker whose app walks you through both is doing you a favour.
An install you can reverse. Pedals come off as fast as they go on, which matters if you have a trainer bike and an outdoor bike. A bonded arm or a spider does not.
Honest fitment limits.Favero publishing "no extenders, no shorteners, nothing thicker than 15 mm at the thread" is more useful than silence, even though it reads as a restriction.
The short answer
The easiest power meters to fit yourself
| # | Product | Best for | Score | Price |
|---|---|---|---|---|
| 1 | 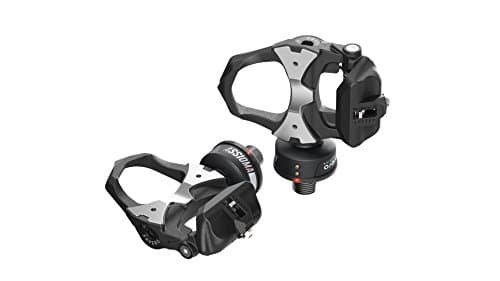 Favero Assioma Duo If you want the install to be a non-event, buy pedals — and these come with the hex key and the clearest documentation. | Easiest install of any power meter | 9.39.3 out of 10 | $539.97 · View on Amazon #ad We may earn a commission · Price as of October 5, 2026 |
| 2 | 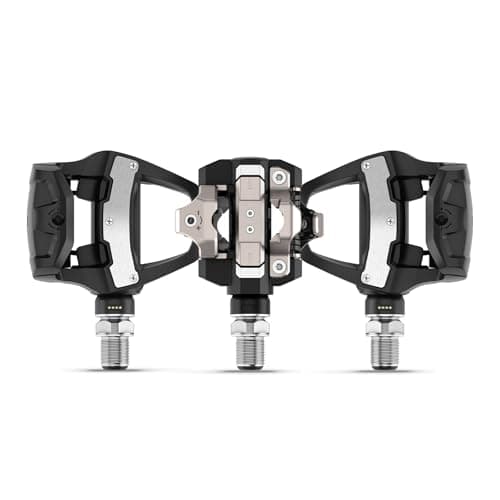 Garmin Rally RS210 The clearest published install procedure in the category, and no cleat change if you already ride SPD-SL. | Best-documented pedal install | 8.88.8 out of 10 | |
| 3 | 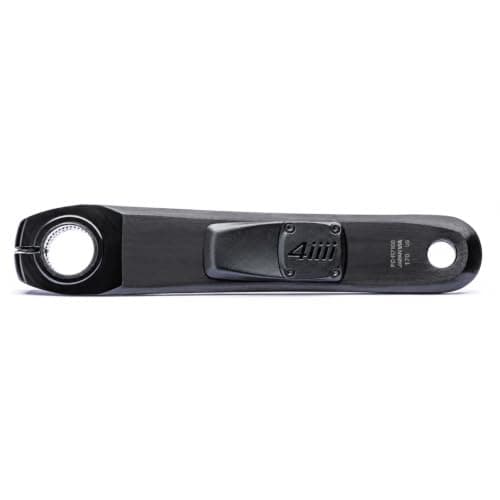 4iiii Precision 3+ The crank install is genuinely easy — a crank bolt and two pinch bolts — but the compatibility work happens before you order, not after. | Easiest crank install, if the part matches | 8.68.6 out of 10 | $437.49 · View on Amazon #ad We may earn a commission · Price as of October 5, 2026 |
Installing pedal-based power meters
1. Clean and grease the threads.Clean the crank threads, then put a thin layer of bike grease on the pedal spindle. Garmin's manual calls for exactly this, and it matters more than it sounds: a dry install can gall the threads, and a galled crank thread is an expensive mistake.
2. Right pedal first, and remember the left is reverse-threaded. The drive-side pedal tightens clockwise; the non-drive-side pedal tightens counter-clockwise. Thread each one in by hand for a few turns first to confirm it is engaging straight — if it resists in the first couple of turns, back it out and start again rather than forcing it.
3. Torque to the manufacturer's figure.Garmin specifies 25 ft-lb (34 Nm). Favero's Pro RS manual specifies 30 to 40 Nm. Use a torque wrench if you have one; Garmin's fallback instruction is "as tight as possible using a pedal wrench", which tells you this is a firm fitting, not a delicate one.
4. Rotate the crank and check chain clearance. Turn the cranks a full revolution and watch the chain. If it rubs the pedal body, Garmin permits one pedal washer between the spindle and the crank arm — one, not two. Favero also supplies washers for clearance from the chain or frame. If one washer is not enough, that pedal and that frame are not a good match.
5. Check the spindle protrusion, if your maker specifies it.Favero requires the spindle end to protrude at least 1 mm beyond the crank thread, which is why cranks thicker than 15 mm at the threaded area are excluded.
Installing a bonded crank-arm power meter
1. Remove the existing non-drive-side arm.On a Shimano Hollowtech II crankset that is the crank cap, then the two pinch bolts, then the arm. The bottom bracket stays where it is.
2. Fit the new arm.Slide it onto the spindle, snug the crank cap to set preload, then torque the pinch bolts to the crankset maker's specification — this is the crankset's figure, not the power meter's, so use Shimano's or your manufacturer's number rather than a figure from memory.
3. Check clearance. Turn the cranks and confirm the bonded pod clears the chainstay and anything else close to it. Pods sit inboard, and frame clearances vary.
4. Zero offset, then ride. A refit always needs a zero offset, because you have just changed the resting strain in the sensor.
Installing a spider or a complete crankset
This is the one case where we would point most riders at a shop. A spider swap involves separating the spider from the crank, and a crankset install involves the bottom bracket interface, preload and chainline. None of it is exotic, but the failure modes — a creaking bottom bracket, an over-preloaded crank, a chainline that shifts badly — are tedious to diagnose and easy to create. If you already change your own bottom brackets, you do not need this paragraph. If you do not, the labour cost is small against the price of the meter.
The three setup steps that decide your data quality
1. Enter your crank length.Do this before the first ride. Power is torque multiplied by angular velocity, and torque is force at the pedal multiplied by the crank radius — so a pedal-based meter cannot compute power without knowing how long your cranks are. The figure is stamped on the back of most crank arms. Enter 172.5 mm when you ride 165 mm and every number you ever record is about 4.5% out. On Favero pedals it is set in the app; on Garmin it is in the sensor settings on the head unit; Magene sets it in the Magene Utility app. Re-enter it every time the pedals move to a different bike.
2. Run a zero offset. Unclip, let the cranks hang still, and run the calibration or zero-offset function from your head unit or app. Do it when the meter is new, after any refit, and after a significant temperature change — a meter that has been in a cold garage is the classic case. How to calibrate a power meter covers how often this actually matters.
3. Do one dual-recorded ride. Record your trainer and your new power meter at the same time for one steady session, then compare the averages. You are not looking for them to match — they will not, and how accurate are power meters explains why a few percent of offset between two honest devices is normal. You are looking for a sane, consistent difference. A 15% gap means something is wrong, and the first thing to re-check is the crank length.
The four mistakes that cause most bad power data
Wrong crank length. The most common, the most invisible, and the easiest to fix. Check it first, always.
No zero offset after fitting. You changed the resting strain when you torqued the pedal. The meter needs to be told.
Under- or over-torqued. Under-torqued pedals can loosen on the ride, which is a safety problem as well as a data problem. Over-torqued risks the crank threads. Use the published figure.
Two washers instead of one.Garmin says one pedal washer per side, maximum. Stacking washers to clear a chain changes the pedal's position relative to the crank and is explicitly warned against.
What to do with it once it is fitted
Test, then train. An FTP figure from your own meter is what turns the install into a training tool: how to do an FTP test covers the protocols, how to improve your FTP covers the block that follows, and the best power meters is the page to go back to if you have not bought one yet.
Not bought one yet?
See the best power meters, compared on the specsThe full reviews
Every pick, in detail
Easiest install of any power meter
Favero Assioma Duo
9.39.3 out of 10#ad We may earn a commission · Price as of October 5, 2026
If you want the install to be a non-event, buy pedals — and these come with the hex key and the clearest documentation.
- Install type
- Pedal — thread into the crank
- Tools
- 8 mm hex key (supplied) or a 15 mm pedal wrench
- Torque
- 30-40 N-m (Favero Pro RS manual)
- Setup step
- Enter crank length in the app or head unit
- Fitment to check
- Crank thickness at the thread, under 15 mm
- Time
- Minutes
What we'd praise
- A long 8 mm hex key comes in the box, which is the one tool most people do not already own
- Nothing to match before ordering: any crank with standard pedal threads takes it
- Favero publishes the torque figure, the thread-thickness limit and the washer rules — rare clarity
- Comes off as easily as it goes on, so moving it to a second bike is a five-minute job
What we'd flag
- Look Keo cleats, so an SPD-SL rider also has a cleat job to do
- No extenders, no crank shorteners, and the spindle must protrude at least 1 mm past the crank thread
- Needs a zero offset after fitting, like every power meter
The practical case for pedals is that the install is the same job as changing pedals, which most riders have done. Favero's Pro RS manual specifies 30 to 40 Nm, supplies a long 8 mm hex key, and is unusually explicit about the limits: no pedal extenders, no crank shorteners, and the spindle has to protrude at least 1 mm past the crank thread, which rules out cranks thicker than 15 mm there. Favero supplies washers for one legitimate purpose only — clearance from the chain or frame. Our Assioma Duo review covers the pedal itself.
Best-documented pedal install
Garmin Rally RS210
8.88.8 out of 10The clearest published install procedure in the category, and no cleat change if you already ride SPD-SL.
- Install type
- Pedal — thread into the crank
- Tools
- Torque wrench or pedal wrench
- Torque
- 25 ft-lb / 34 N-m (Garmin manual)
- Order
- Right pedal first (Garmin manual)
- Washers
- One per pedal maximum, for chain clearance
- Time
- Minutes
What we'd praise
- Garmin's owner's manual gives a step-by-step sequence and an exact torque figure, which is all you need
- Keeps Shimano SPD-SL cleats, so there is no cleat job attached to the install
- Dual-sensing, so the balance data you get after install is a real measurement
- Sets up through Garmin Connect alongside the rest of a Garmin setup
What we'd flag
- Only one washer per pedal is allowed if the chain rubs — if one is not enough, the pedal is not right for that frame
- The most expensive pick here
- Battery doors on earlier Rally models had a torque specification of their own; follow the manual for your version
Garmin's manual is worth quoting because it is the clearest instruction set here: install the right pedal first, apply a thin layer of bike grease to the spindle, insert the spindle into the spindle hole, tighten to the recommended 25 ft-lb (34 Nm) with a torque wrench if you have one or as tight as possible with a pedal wrench if you do not, then rotate the crank arm to check for chain clearance. If the chain rubs you may add one pedal washer between the spindle and the crank arm — and Garmin explicitly warns against using more than one per pedal. Our Rally RS210 review covers the range.
Easiest crank install, if the part matches
4iiii Precision 3+
8.68.6 out of 10#ad We may earn a commission · Price as of October 5, 2026
The crank install is genuinely easy — a crank bolt and two pinch bolts — but the compatibility work happens before you order, not after.
- Install type
- Replace the non-drive-side crank arm
- Tools
- Hex keys and a torque wrench
- Bottom bracket
- Not removed
- Time
- Around ten minutes
- Fitment to check
- Crankset model and crank length, before ordering
- After fitting
- Zero offset
What we'd praise
- On a Shimano Hollowtech II crank it is a crank bolt and two pinch bolts — no bottom bracket removal
- About ten minutes with tools most home mechanics already own
- Keeps your existing pedals and cleats, so nothing else on the bike changes
- Nothing to charge and nothing to pair beyond the initial setup
What we'd flag
- All the risk is in ordering: the arm must match your crankset model and crank length exactly
- Single-sided, so the figure it reports is your left leg doubled
- It belongs to that crankset — moving it to another bike is not practical
The Precision 3+ is where crank installs are least intimidating. You are not disturbing the bottom bracket, pressing anything, or facing a frame. On a Shimano Hollowtech II crank it is a crank bolt and two pinch bolts with a hex key and a torque wrench, and about ten minutes. Then a zero offset, and again after any big temperature change or knock.
What makes this install harder than a pedal install is everything that happens before the tools come out. You have to know your crankset model and your crank length, and order the arm that matches. Get that wrong and no amount of careful fitting helps. Our 4iiii Precision review covers the unit and best crank power meters covers the alternatives.
Good questions
Frequently asked questions
How do you install a power meter?
For pedal-based meters: clean and grease the crank threads, install the right pedal first, thread each pedal in by hand a few turns, torque to the maker's figure (25 ft-lb / 34 N-m for Garmin Rally, 30 to 40 N-m per Favero's Pro RS manual), then rotate the crank and check chain clearance. For a bonded crank arm on a Shimano Hollowtech II crankset it is a crank cap and two pinch bolts with no bottom bracket removal, about ten minutes. Then enter your crank length and run a zero offset.
What torque should power meter pedals be tightened to?
Garmin's Rally owner's manual specifies 25 ft-lb (34 N-m), and says to use a torque wrench if available or to tighten as tight as possible with a pedal wrench if not. Favero's Assioma Pro RS manual specifies 30 to 40 N-m. Always use the figure in your own product's manual rather than a general number.
Do I need a torque wrench to install a power meter?
It is strongly preferable for pedals and effectively required for a crank arm or crankset, where the pinch-bolt and crank-bolt figures come from the crankset maker. Garmin's manual does offer a fallback for pedals — as tight as possible with a pedal wrench — because the failure mode for pedals is under-tightening, not over-tightening.
Do I need to enter my crank length for a power meter?
For any pedal-based meter, yes, and it is the single most important setup step. Power is derived from force acting through the crank radius, so an incorrect crank length scales every reading proportionally — entering 172.5 mm when you ride 165 mm makes every number about 4.5% wrong, permanently. The figure is usually stamped on the back of the crank arm. Re-enter it whenever the pedals move to a different bike.
Can I install a power meter myself?
Pedal-based meters, yes — it is the same job as changing pedals, plus a torque figure. A bonded crank arm, yes if you are comfortable with a crank cap and pinch bolts, because the bottom bracket is not disturbed. A spider or a complete crankset is a drivetrain job involving bottom bracket interface, preload and chainline, and most riders are better off paying a shop for that one.
Why is the left pedal reverse-threaded?
So that pedalling tightens it rather than loosening it. The drive-side pedal has a standard right-hand thread and the non-drive-side pedal has a left-hand thread, which means the drive-side tightens clockwise and the non-drive-side tightens counter-clockwise. Forcing a left pedal clockwise is how crank threads get destroyed.
Do I need to calibrate a power meter after installing it?
Yes. Fitting the meter changes the resting strain in its sensor, so the stored zero point no longer describes what no load looks like. Run a zero offset from your head unit or the maker's app once installed, and again after any refit or significant temperature change.
My chain rubs the power meter pedal. What do I do?
Garmin's manual permits adding one pedal washer between the spindle and the crank arm to increase clearance, and explicitly warns against using more than one per pedal. Favero also supplies washers for clearance from the chain or frame. If a single washer does not resolve it, that pedal is not a good match for that frame — stacking washers changes the pedal's position and is not a fix.
How we sourced this
- Garmin — Installing Rally Pedals, owner's manual (right pedal first, thin layer of grease, 25 ft-lb / 34 N-m, rotate crank for chain clearance, one washer maximum)
- Favero — Assioma PRO RS specifications and user manual (30-40 N-m, no extenders or crank shorteners, 1 mm spindle protrusion, 15 mm crank-thread limit, clearance washers, crank length in the app)
- Favero — Assioma Duo specifications (manufacturer)
- 4iiii — Precision 3+ specifications (manufacturer)
- Shimano — product information portal, crankset torque specifications (manufacturer)
- SRAM / Quarq — AXS power meter spider specifications (manufacturer)
- Magene — power meter specifications and Magene Utility app setup (manufacturer)
Keep going
Read these next
- Power MetersHow to Calibrate a Power Meter
- GuidesHow Accurate Are Power Meters?
- ComparisonPower Meter Pedals vs Cranks
- Power MetersThe Best Power Meters, Compared on the Specs
- Power MetersThe Best Power Meters for Shimano Bikes
- Power MetersThe Best Power Meter Pedals, Compared
- GuidesHow to Do an FTP Test
- GuidesHow to Improve Your FTP